Archive
This post is archived and may contain outdated information. It has been set to 'noindex' and should stop showing up in search results.
This post is archived and may contain outdated information. It has been set to 'noindex' and should stop showing up in search results.

Budget Gaming PC Buyer's Guide And Build How-To With Pictures
Jul 13, 2016Computer HardwareComments (0)
This is a step-by-step guide showing how to purchase and build a custom gaming PC for around $500 US. I will list the exact components that were used, with links to Amazon, and show you in detail how to put it together. Each year I will keep this guide updated along with my own PC upgrades.
The $500 (USD) price point gives a very high bang-for-the-buck in both gaming and general computing tasks. This build will outperform any Dell or HP prebuilt PC at the same price, and will also outperform the Xbox One and PS4. You can expect to play the latest games at 'High' settings at full 1080p HD, and achieve 40 to 75 frames per second depending on the game.
There are 8 computer components you'll need in order to build a complete gaming PC. Each one is listed here, along with my recommendation for the specific component to buy that will assure compatibility during the build section.
Input Devices
The above list does not include the keyboard or mouse. It's just the computer itself. The options when it comes to input devices are so great that it's hard to recommend something that everyone would like. I personally recommend the Logitech G402 and Microsoft Keyboard 4000. Just about anything by Logitech or Microsoft that has good ratings will work great (just search Amazon or Newegg).
Monitor
I can't really give any recommendation here as the options are limitless. You can hook up just about any LCD/LED monitor or HDTV. This build supports DVI, VGA, HDMI, and DisplayPort.
Operating System
I won't cover the operating system or software side of this build. If you already have a copy of Windows from an old PC, you may be able to use it on the new build. Or you may need to purchase a new license. Windows 7, Windows 8.1, and Windows 10 are all good choices. If you want to try something different, give Ubuntu Linux a try.
Make sure you have basic computer tools and a clear work-space to work with. If you don't have tools, I recommend the Rosewill 45-piece tool kit. An Anti-Static Wrist Strap is also a good idea for beginners (comes in the 45-piece tool kit). The fasteners, cables, and other hardware you will need will come with your components.
Once you have all of your components, lay them out neatly in your work-space. Before you start opening bags though, wash your hands to clean off any corrosive oils. Be sure to follow the directions that came with your anti-static wristband for how to use it, and put it on any time you're handling components out of their bags. The case, power supply, and optical drive can generally be handled without worrying about static, but everything else should be handled with great care. It's also best to remove components from their anti-static bags only right before installing them.
Step 1
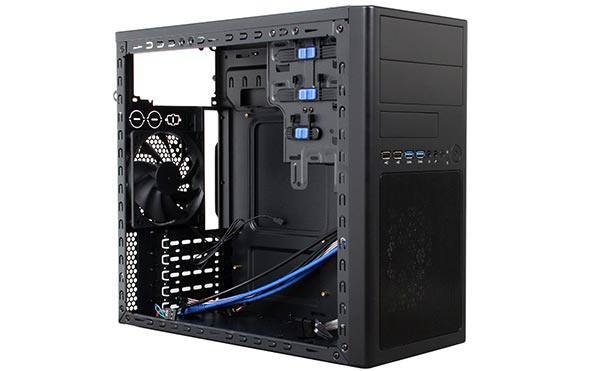
Remove both side panels from the case. To do this, first remove the four thumb screws at the back (two on each side), then slide the panels back a little before pulling them out.
Step 2
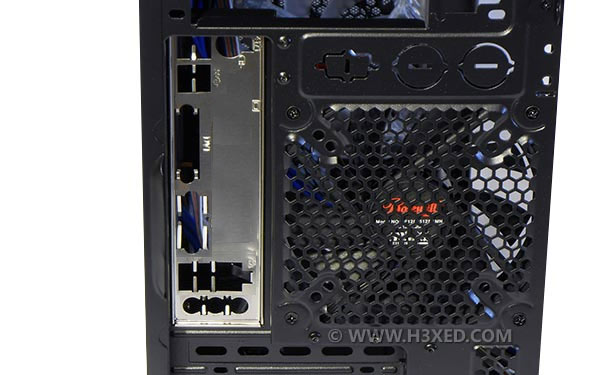
Press the motherboard port cover into the back of the case, with the 3 round audio port holes at the bottom.
Step 3
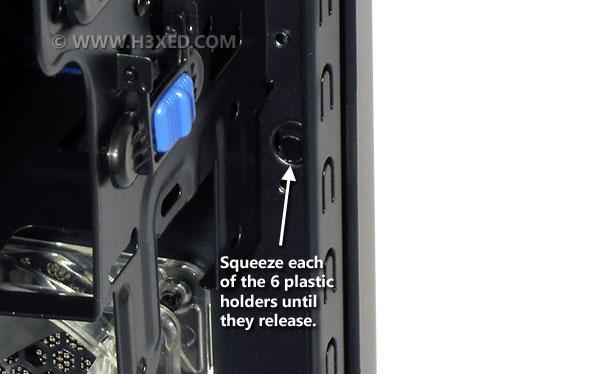
Pull the front panel off of the case by compressing the six small plastic snaps behind the sills.
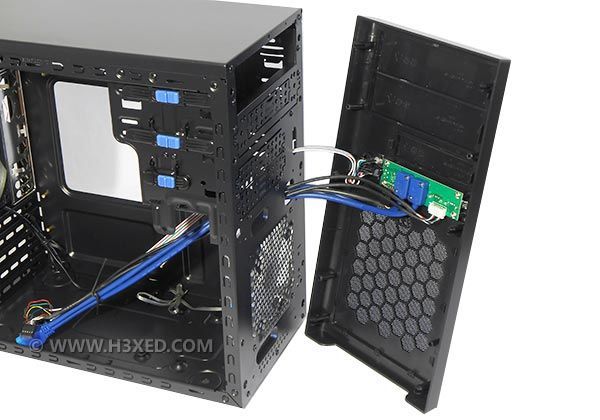
Do not pull the front panel off all of the way out though; just enough to work behind it.
Step 4
If you are going to have an optical (DVD) drive, remove the top bay cover from the front panel to allow room for it. The cover slides out from the inside of the panel and is held in by a couple small plastic snaps.
While working with the front panel, I recommend removing the front fan, unless you're in a really hot climate or plan to keep the PC somewhere with poor airflow. Generally it won't be needed, since this is a low-power build. The fan is held on by four Phillips screws.
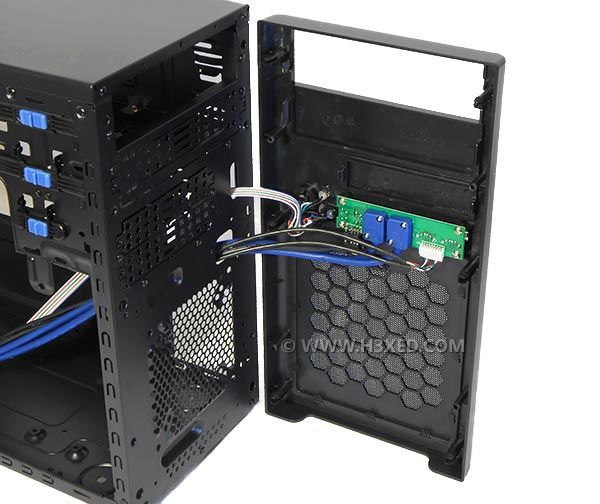
After doing this, snap the front panel back on. Just press it back on carefully until all six snaps snap in place.
Step 5
Now lay the case on its side so that you can more easily install the components. Make sure the wires that are sticking into the case from the front are tucked out of the way for now.
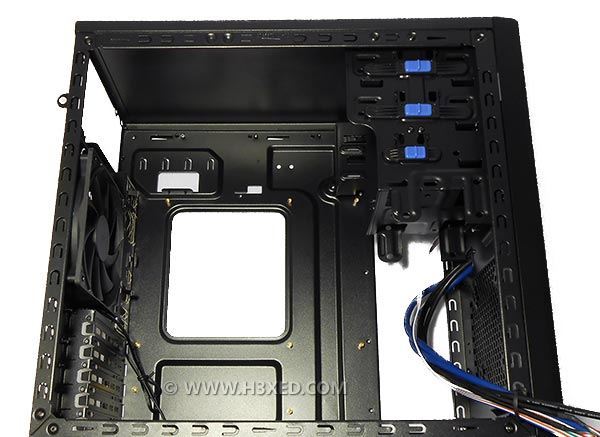
Step 6
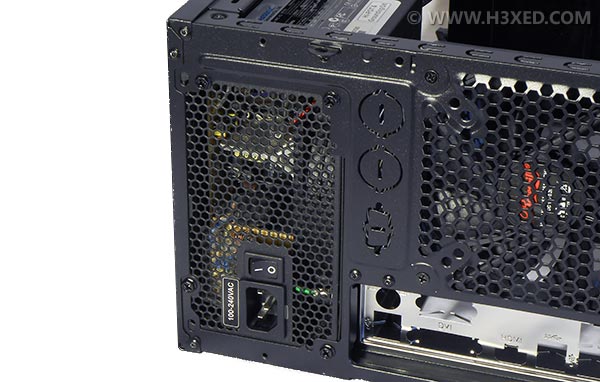
Place the power supply into the case, with the large fan aiming downwards.
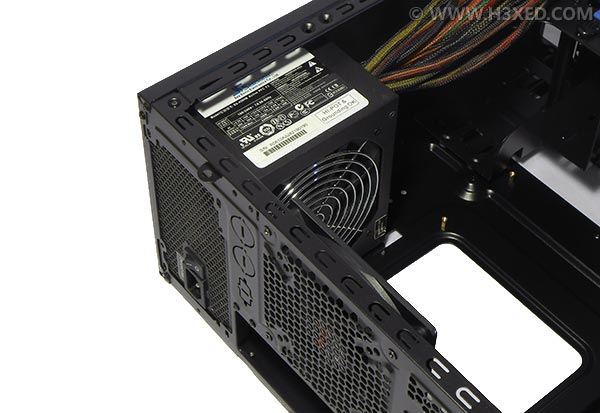
Fasten it in using four coarse-thread screws in the back (the screws come in the little plastic hardware packet with the case).
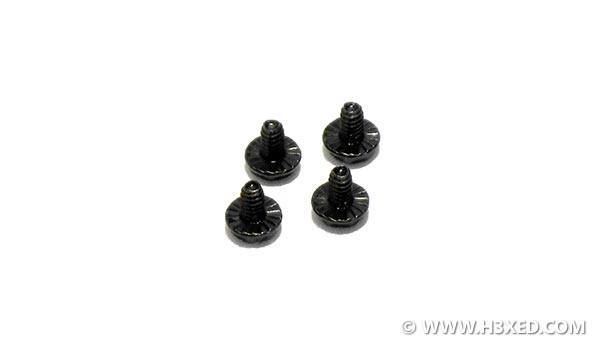
You may have to tighten each screw a little bit at a time in sequence. Do not cross-thread or strip the screws by tightening too much.
Step 7
Now install the DVD drive (if you are using one). First push the little blue piece of plastic at the top drive bay towards "Open", then lift it up. Then slide the optical drive in through the front.
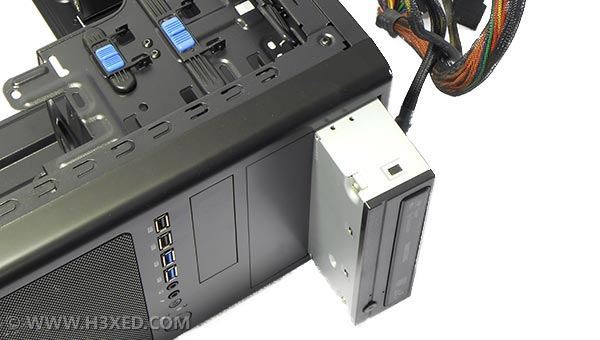
Once the optical drive is flush with the front, you should be able to push the plastic holder back down and slide the blue plastic towards "Lock".
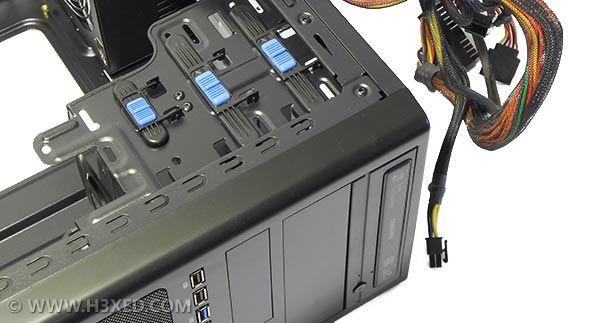
I recommend using a couple fine-thread screws to better secure the optical drive. You should see where the holes line up with the threaded holes on the optical drive.
Step 8
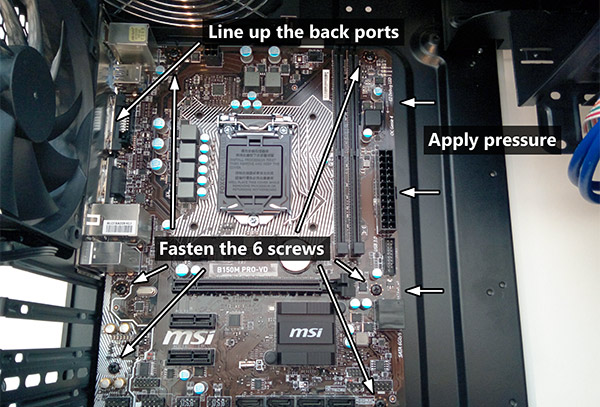
Now to install the motherboard. Carefully set it down into the case so that the ports on the back line up with the port cover at the back of the case. The little prongs on the port cover will push against the motherboard to provide tension. They'll probably be too tight from the factory so you may want to bend them looser a little bit beforehand.
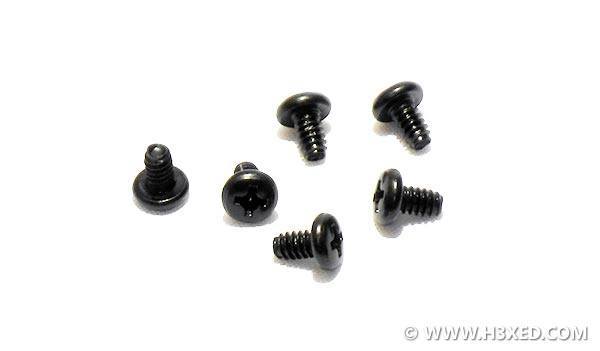
While providing pressure on the motherboard to push it back against the port cover, you should be able to get the 6 holes on the motherboard to line up with 6 of the motherboard stands (the screw receptacles). While providing pressure, screw in 6 coarse-thread screws to hold the motherboard in place.
Step 9
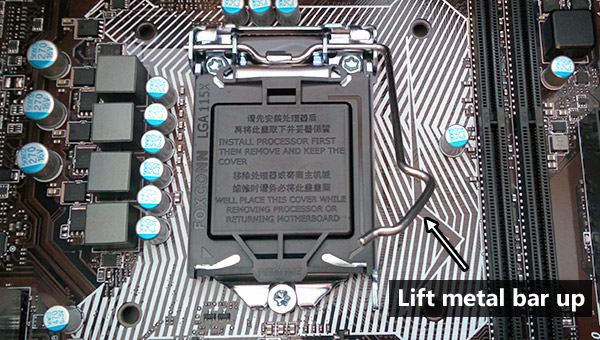
Now to prepare the motherboard for the processor. Apply pressure to the little metal bar next to the CPU socket and pull it away from the socket so that it pops loose and up.
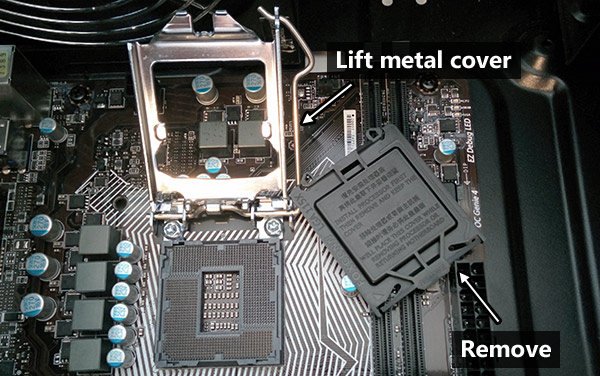
Lift the metal CPU cover up and remove the black plastic cover. Be careful not to damage the socket or let anything hit it.
Step 10
Carefully place your CPU onto the socket so that the two indents line up and it fits in place.
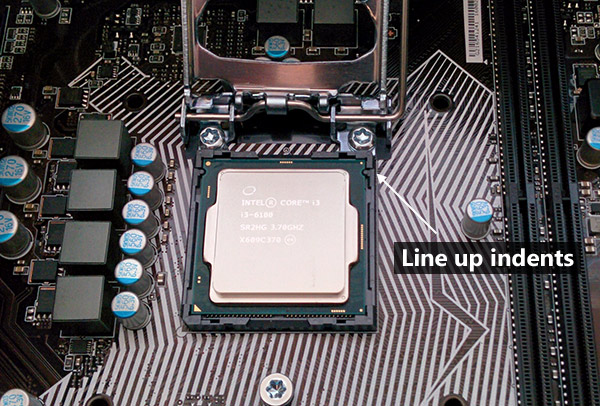
Flip the metal bracket back over the CPU gently, making sure the tabs slide under the bolt head.
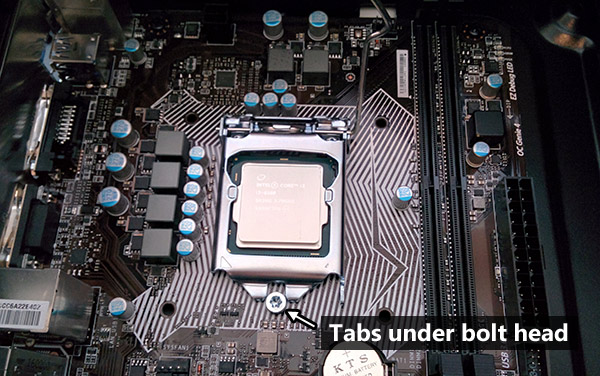
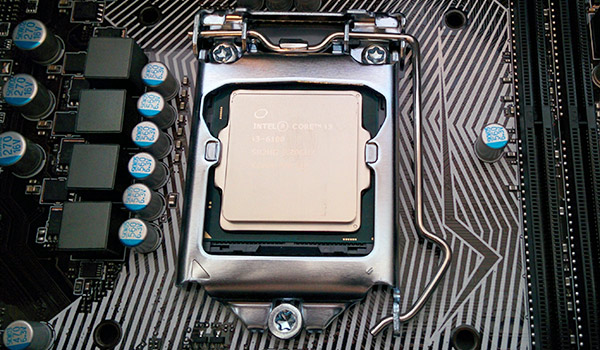
Pull the metal bar back down, press it down, and slide it into place so it locks. You'll have to use a fair amount of pressure, but don't force it.
Step 11
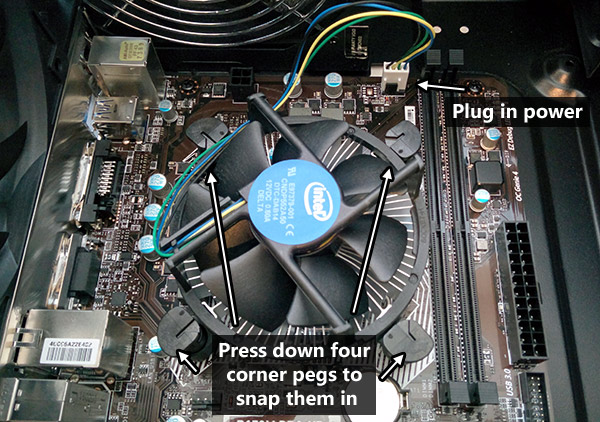
Remove the clear plastic cover from the CPU heatsink, being careful not to touch the thermal compound. Set it over top of the CPU, oriented like in the picture. Press down on each of the four posts until each snaps into place. Get the fan power wire loose and plug it into the receptacle on the motherboard.
Step 12
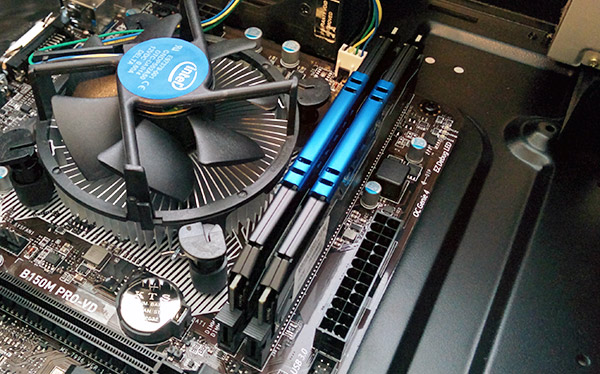
Now to install the two memory modules. Pull the little tabs back so the slots are ready to receive their memory modules:
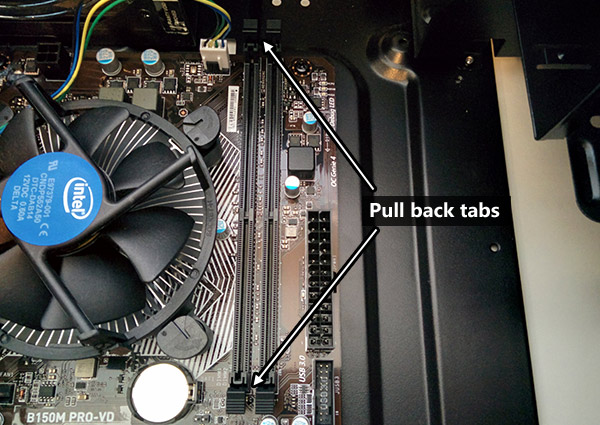
Carefully press each memory module in, making sure you have the correct orientation. The notch in the module allows it to go in only one way. They should snap in, and you should be able to push the tabs back in fully.
Step 13
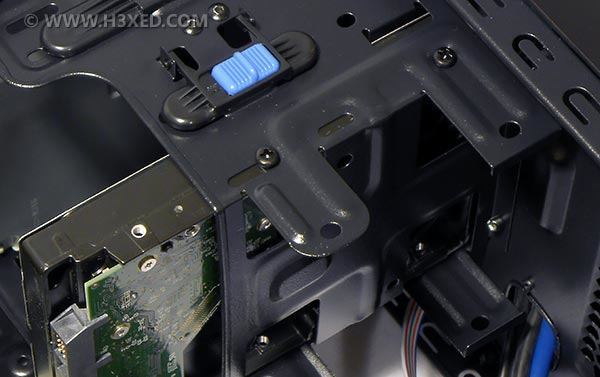
Next is the hard drive. Slide it in to the following bay and use four coarse-thread screws to secure the drive in from both sides. Two on each side (you'll have to lift the PC case up to get to the other side).
Step 14
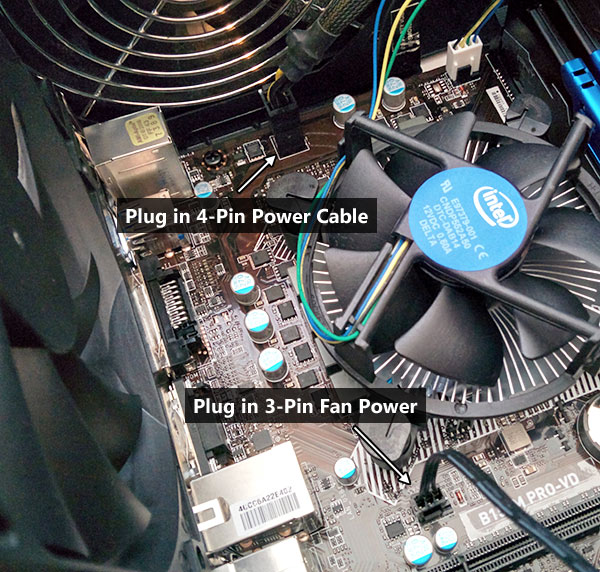
Now we're going to start plugging in the power cables. Start by plugging in the square 4-pin power plug in the top-left corner of the motherboard. Then plug in the small exhaust fan power plug into the power receptacle to the bottom left of the CPU.
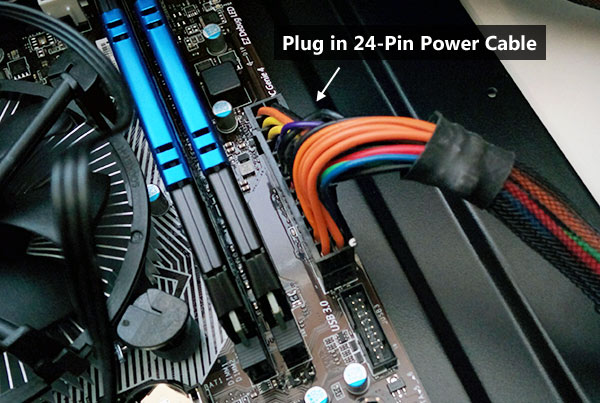
Connect the large power cable to the motherboard:
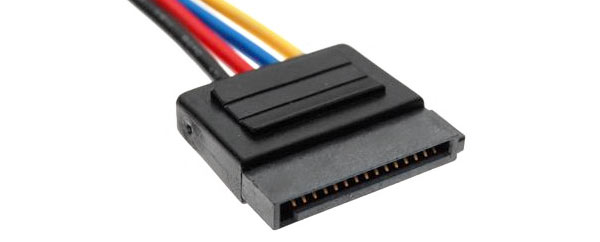
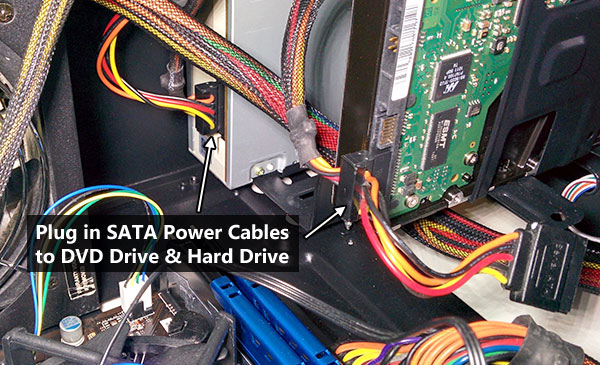
Connect SATA power cables to the hard drive and optical drive. The SATA power cables are black and thin, and you will have more than two to choose from (you'll be able to hook up more hard drives in the future if you want).
Step 15
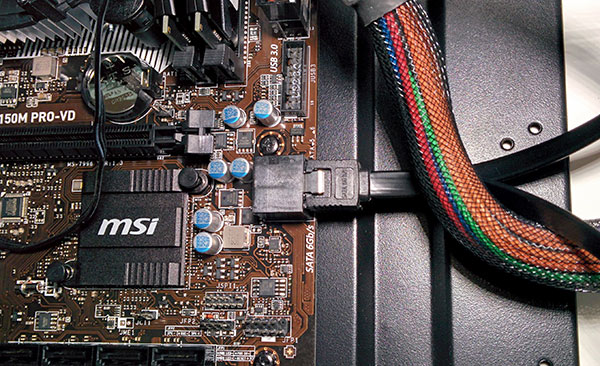
Connect the data cables, which are the two black SATA data cables that came with the motherboard. The plugs on these are a little smaller than the SATA power cables. Connect one end of each SATA data cable to these ports on the motherboard:
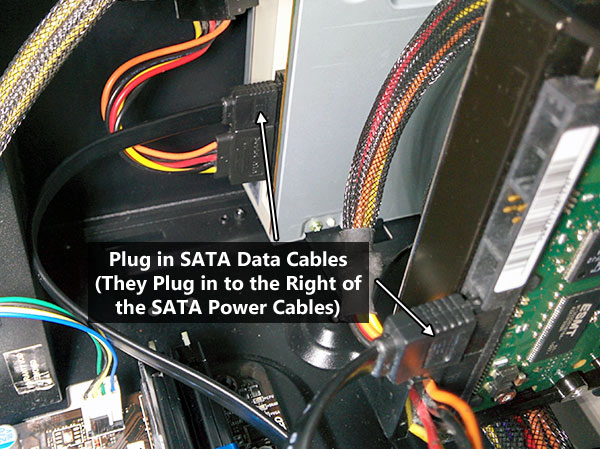
Then connect the other end of each SATA cable to the hard drive and optical drive. I usually route the wires behind the drive cage for a cleaner look.
Step 16
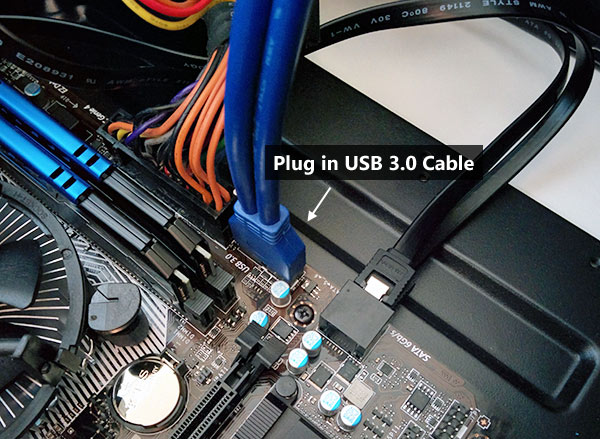
Connect the USB 3.0 front header connector. It's the large dual-wire blue connector. Use a side-to-side rocking motion to gently (but firmly) press it into the socket. It's a tight fit:
Step 17
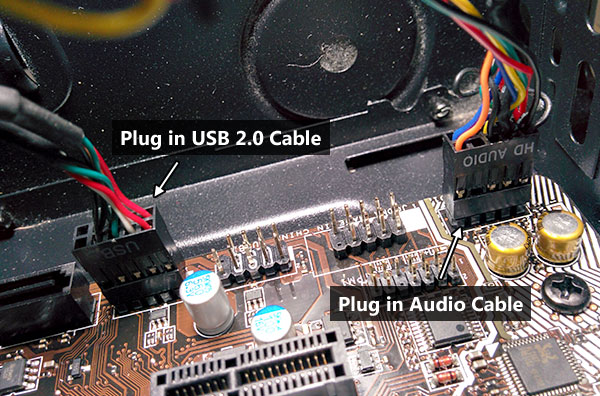
Connect the USB 2.0 front header connector to the JUSB1 port on the motherboard and the HDAUDIO front header connector to the JAUD1 port. You'll be ignoring the AC' 97 plug, so just tie it away.
Step 18
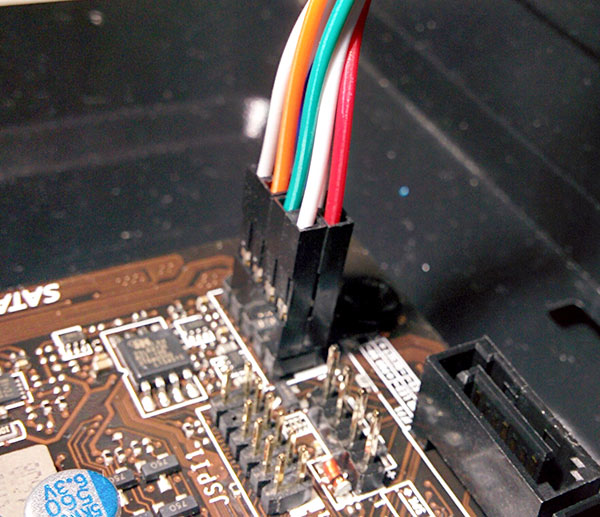
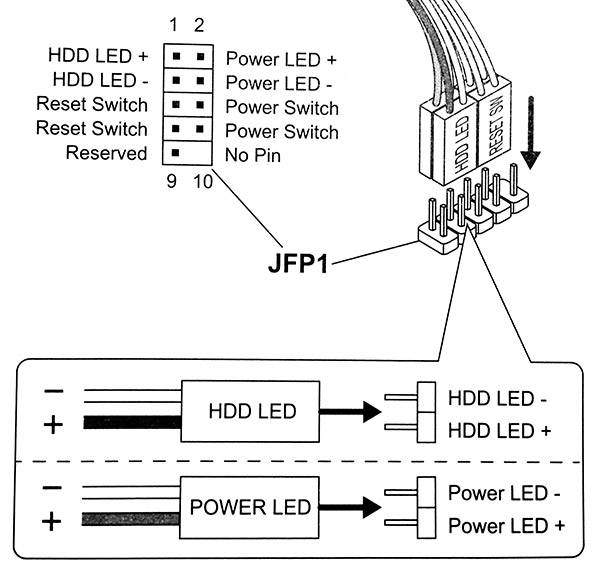
Now to connect the front panel buttons and lights. This is probably the most difficult part of building a PC, since the connectors are small and need to go in the correct order. The connectors that you need to hook up are labeled RESET SW, POWER SW, H.D.D LED, POWER LED+, and POWER LED-, and they need to connect to the motherboard at the JFP1 receptacle at the bottom right of the motherboard.
Refer to the diagram below and picture to see how they go in.
Step 19
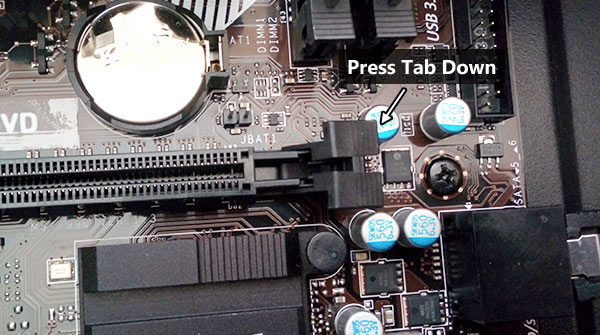
The last major step is the graphics card installation. On the motherboard, make sure the gray wing-shaped lever is pressed down:
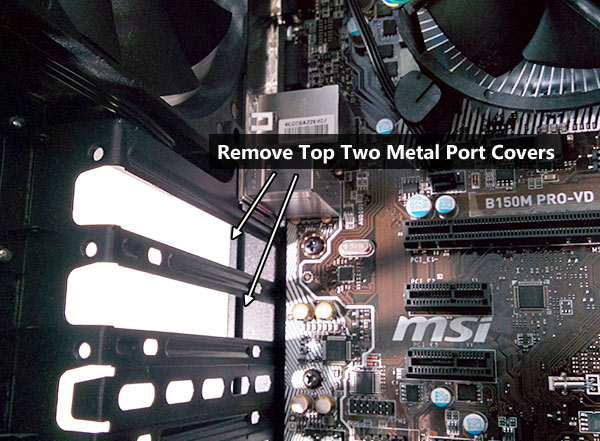
Remove the top two rear ports of the back of the case by bending them inward back and forth until they snap off:
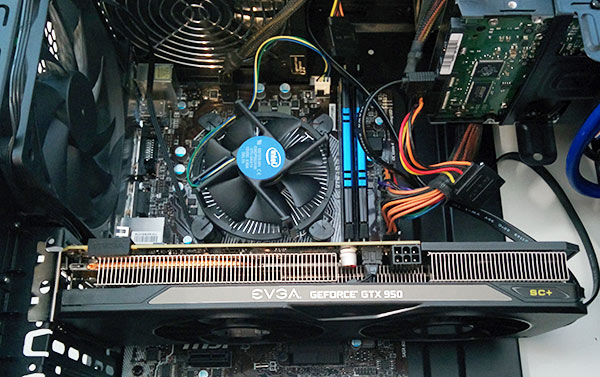
Remove the plastic cover and any protective covers from the graphics card, then put it gently in place. Make sure the connector lines up with the black PCI Express x16 port on the motherboard.
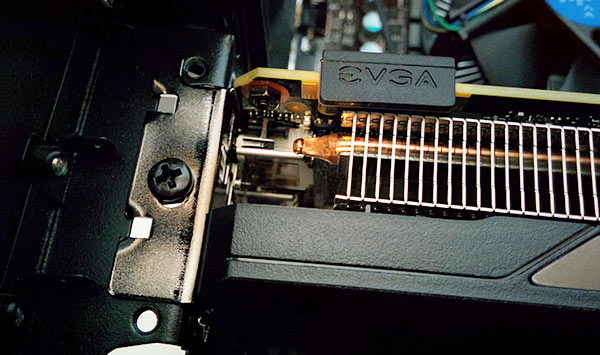
As you push down, the graphics card will fit snugly and the little wing-shaped lever will snap back to hold it down. Make sure the screw holes on the back line up. You'll want to add a single coarse screw to hold the GPU in place firmly.
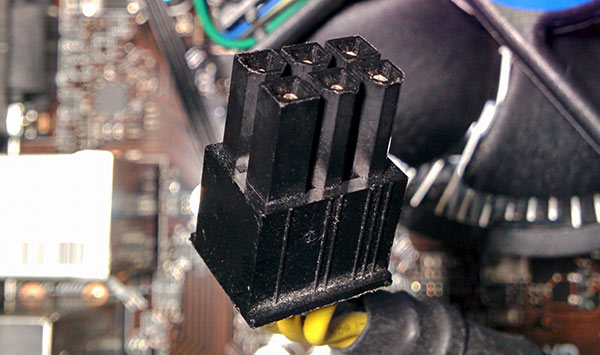
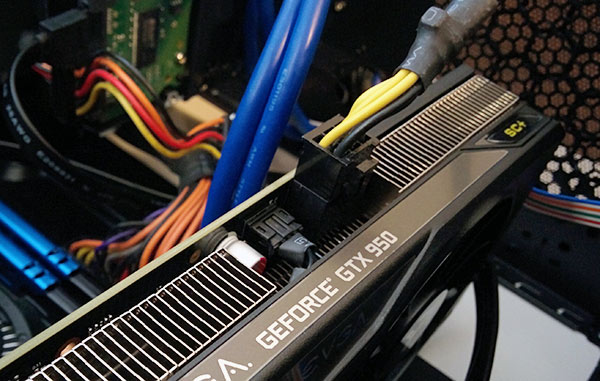
Now plug in the 6-pin power connector from the power supply to the power port on the side of the graphics card:
Step 20
Now to clean up the cables and make the inside of the case somewhat tidy. Use zip ties and twisty ties, and try to route cables out of the way of any fans or components. The goal is to make sure the cables do not block airflow or rest against anything that moves or gets hot.
The power supply will have a lot of unused cables coming out of it. Carefully coil/fold them up and neatly push them into the unused optical drive bay (between the hard drive and optical drive). Use ties to secure them. If we were using a more expensive modular power supply, we wouldn't have extra wires hanging around, but since this is a budget build we make do with what we have.
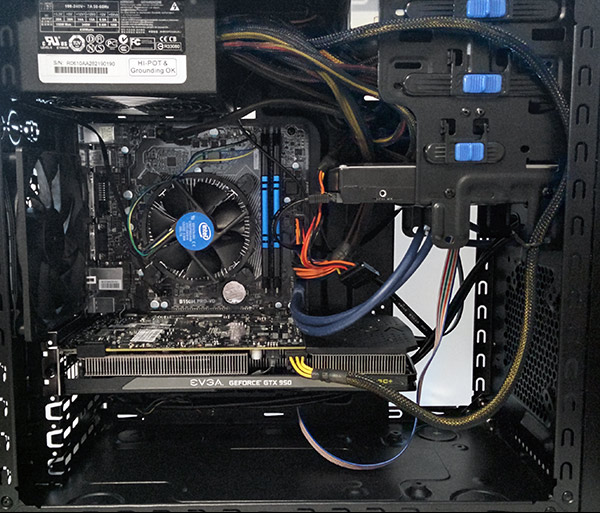
Your system should now look similar to this:
Step 23
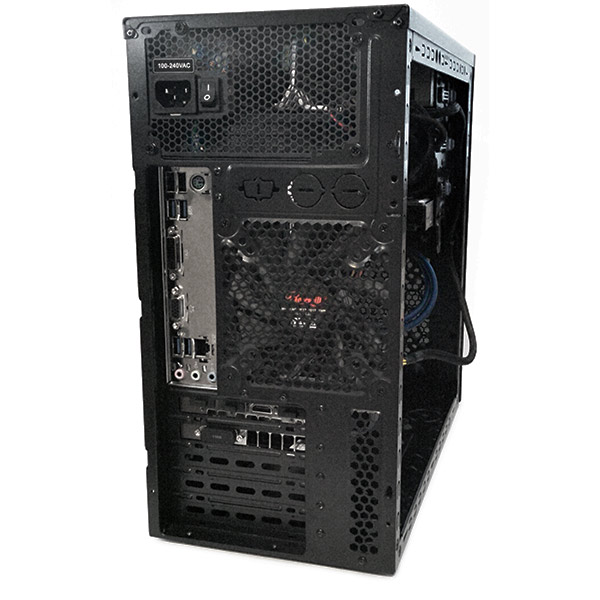
With the side panels back on:
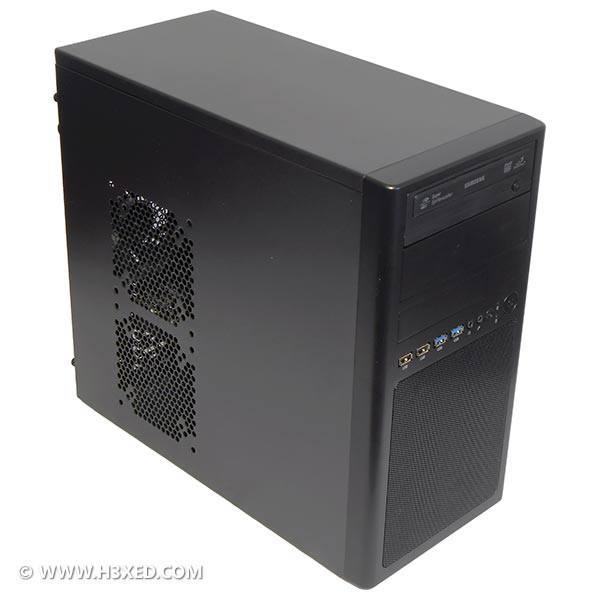
Your PC is done!
It's a good idea to run through the guide again really quick to make sure you didn't forget anything. It can be easy to forget to connect a power or data cable. Usually this won't cause any damage, but may error when booting.
To test it, connect your PC up to your keyboard, mouse, monitor, and power, and then press the power button on the front. I recommend removing one side panel and making sure all of the fans are spinning properly. When you first start it, the fans may spin loudly or change speeds multiple times. This is normal.
You can get into the BIOS by tapping Delete repeatedly during startup. The BIOS allows you to check hardware and various settings. Refer to the motherboard manual for BIOS details.
Operating system installation won't be covered in this guide.
If the PC doesn't do anything when you press the power button, make sure the power supply switch on the back is flipped to "I" and not "O".
If the PC starts, but does not boot up or shows an error, you may be able to check the error beep codes in the motherboard manual.
If you come across any errors, one good thing to try first is to clear the CMOS. This can fix strange boot issues on occasion and is easy to do. Follow the instructions in the motherboard manual to clear the CMOS.
Selecting & Purchasing Components
The $500 (USD) price point gives a very high bang-for-the-buck in both gaming and general computing tasks. This build will outperform any Dell or HP prebuilt PC at the same price, and will also outperform the Xbox One and PS4. You can expect to play the latest games at 'High' settings at full 1080p HD, and achieve 40 to 75 frames per second depending on the game.
There are 8 computer components you'll need in order to build a complete gaming PC. Each one is listed here, along with my recommendation for the specific component to buy that will assure compatibility during the build section.
- Computer Case
Micro ATX tower cases are ideal for gaming PCs. They are compact, yet have plenty of room for expansion. Their ubiquity also means prices stay low. The Rosewill Line-M is great for this price point. Rosewill LINE-M Black Case
Amazon.com - Power Supply (PSU)
This build has low power usage (228W PCPartPicker estimate), so a 430 watt power supply will work well and give room for a GPU or CPU upgrade in the future. EVGA's 430W PSU balances price and quality very well. EVGA 430W Power Supply
Amazon.com - Motherboard (MB)
The MSI Pro-VD motherboard is a very compact motherboard that has all of the features we'll need for this build. MSI Pro-VD Motherboard
View on Amazon - Processor (CPU)
The Intel Core i3-6100 (3.7GHz) has excellent performance-per-dollar. It is dual core with a total of 4 threads. Intel Core i3-6100 Processor
View on Amazon - Graphics Card (GPU)
This guide was originally written with the GTX 950 in mind. The GTX 1050 is out now and a better choice. Depending on the one you purchase, the installation instructions in the next section may be a little different. GeForce GTX 1050
Search on Amazon - Memory (RAM)
You could get by with 4GB or 8GB of memory, but for future-proofing I recommend 16GB. This dual kit (2x8GB) will take advantage of the i3's dual-channel memory controller. PNY 16GB DDR4 Memory
View on Amazon - Hard Drive (HDD)
Western Digital (WD) has a great reputation in hard drives. It's always good to choose one with high ratings, since you don't want to lose any data to a failure. For budget builds, a 1TB drive is a good choice. WD 1TB Hard Drive
Amazon.com - Optical Drive (DVD or Bluray drive)
You'll probably need a DVD drive for the occasion that you need to install or watch something via disc. If you need to read Blurays, you may want to spring for a Bluray drive instead. If you rarely use a DVD drive at all, maybe consider just keeping an external USB DVD drive in the closet and skip the internal DVD drive altogether. DVD Drive
Amazon.com
Input Devices
The above list does not include the keyboard or mouse. It's just the computer itself. The options when it comes to input devices are so great that it's hard to recommend something that everyone would like. I personally recommend the Logitech G402 and Microsoft Keyboard 4000. Just about anything by Logitech or Microsoft that has good ratings will work great (just search Amazon or Newegg).
Monitor
I can't really give any recommendation here as the options are limitless. You can hook up just about any LCD/LED monitor or HDTV. This build supports DVI, VGA, HDMI, and DisplayPort.
Operating System
I won't cover the operating system or software side of this build. If you already have a copy of Windows from an old PC, you may be able to use it on the new build. Or you may need to purchase a new license. Windows 7, Windows 8.1, and Windows 10 are all good choices. If you want to try something different, give Ubuntu Linux a try.
Building The Computer
Make sure you have basic computer tools and a clear work-space to work with. If you don't have tools, I recommend the Rosewill 45-piece tool kit. An Anti-Static Wrist Strap is also a good idea for beginners (comes in the 45-piece tool kit). The fasteners, cables, and other hardware you will need will come with your components.
Once you have all of your components, lay them out neatly in your work-space. Before you start opening bags though, wash your hands to clean off any corrosive oils. Be sure to follow the directions that came with your anti-static wristband for how to use it, and put it on any time you're handling components out of their bags. The case, power supply, and optical drive can generally be handled without worrying about static, but everything else should be handled with great care. It's also best to remove components from their anti-static bags only right before installing them.
Step 1
Remove both side panels from the case. To do this, first remove the four thumb screws at the back (two on each side), then slide the panels back a little before pulling them out.

Step 2
Press the motherboard port cover into the back of the case, with the 3 round audio port holes at the bottom.

Step 3
Pull the front panel off of the case by compressing the six small plastic snaps behind the sills.

Do not pull the front panel off all of the way out though; just enough to work behind it.

Step 4
If you are going to have an optical (DVD) drive, remove the top bay cover from the front panel to allow room for it. The cover slides out from the inside of the panel and is held in by a couple small plastic snaps.
While working with the front panel, I recommend removing the front fan, unless you're in a really hot climate or plan to keep the PC somewhere with poor airflow. Generally it won't be needed, since this is a low-power build. The fan is held on by four Phillips screws.

After doing this, snap the front panel back on. Just press it back on carefully until all six snaps snap in place.
Step 5
Now lay the case on its side so that you can more easily install the components. Make sure the wires that are sticking into the case from the front are tucked out of the way for now.

Step 6
Place the power supply into the case, with the large fan aiming downwards.

Fasten it in using four coarse-thread screws in the back (the screws come in the little plastic hardware packet with the case).

You may have to tighten each screw a little bit at a time in sequence. Do not cross-thread or strip the screws by tightening too much.

Step 7
Now install the DVD drive (if you are using one). First push the little blue piece of plastic at the top drive bay towards "Open", then lift it up. Then slide the optical drive in through the front.

Once the optical drive is flush with the front, you should be able to push the plastic holder back down and slide the blue plastic towards "Lock".

I recommend using a couple fine-thread screws to better secure the optical drive. You should see where the holes line up with the threaded holes on the optical drive.
Step 8
Now to install the motherboard. Carefully set it down into the case so that the ports on the back line up with the port cover at the back of the case. The little prongs on the port cover will push against the motherboard to provide tension. They'll probably be too tight from the factory so you may want to bend them looser a little bit beforehand.
While providing pressure on the motherboard to push it back against the port cover, you should be able to get the 6 holes on the motherboard to line up with 6 of the motherboard stands (the screw receptacles). While providing pressure, screw in 6 coarse-thread screws to hold the motherboard in place.


Step 9
Now to prepare the motherboard for the processor. Apply pressure to the little metal bar next to the CPU socket and pull it away from the socket so that it pops loose and up.

Lift the metal CPU cover up and remove the black plastic cover. Be careful not to damage the socket or let anything hit it.

Step 10
Carefully place your CPU onto the socket so that the two indents line up and it fits in place.

Flip the metal bracket back over the CPU gently, making sure the tabs slide under the bolt head.

Pull the metal bar back down, press it down, and slide it into place so it locks. You'll have to use a fair amount of pressure, but don't force it.

Step 11
Remove the clear plastic cover from the CPU heatsink, being careful not to touch the thermal compound. Set it over top of the CPU, oriented like in the picture. Press down on each of the four posts until each snaps into place. Get the fan power wire loose and plug it into the receptacle on the motherboard.

Step 12
Now to install the two memory modules. Pull the little tabs back so the slots are ready to receive their memory modules:

Carefully press each memory module in, making sure you have the correct orientation. The notch in the module allows it to go in only one way. They should snap in, and you should be able to push the tabs back in fully.

Step 13
Next is the hard drive. Slide it in to the following bay and use four coarse-thread screws to secure the drive in from both sides. Two on each side (you'll have to lift the PC case up to get to the other side).

Step 14
Now we're going to start plugging in the power cables. Start by plugging in the square 4-pin power plug in the top-left corner of the motherboard. Then plug in the small exhaust fan power plug into the power receptacle to the bottom left of the CPU.

Connect the large power cable to the motherboard:

Connect SATA power cables to the hard drive and optical drive. The SATA power cables are black and thin, and you will have more than two to choose from (you'll be able to hook up more hard drives in the future if you want).


Step 15
Connect the data cables, which are the two black SATA data cables that came with the motherboard. The plugs on these are a little smaller than the SATA power cables. Connect one end of each SATA data cable to these ports on the motherboard:

Then connect the other end of each SATA cable to the hard drive and optical drive. I usually route the wires behind the drive cage for a cleaner look.

Step 16
Connect the USB 3.0 front header connector. It's the large dual-wire blue connector. Use a side-to-side rocking motion to gently (but firmly) press it into the socket. It's a tight fit:

Step 17
Connect the USB 2.0 front header connector to the JUSB1 port on the motherboard and the HDAUDIO front header connector to the JAUD1 port. You'll be ignoring the AC' 97 plug, so just tie it away.

Step 18
Now to connect the front panel buttons and lights. This is probably the most difficult part of building a PC, since the connectors are small and need to go in the correct order. The connectors that you need to hook up are labeled RESET SW, POWER SW, H.D.D LED, POWER LED+, and POWER LED-, and they need to connect to the motherboard at the JFP1 receptacle at the bottom right of the motherboard.
Refer to the diagram below and picture to see how they go in.


Step 19
The last major step is the graphics card installation. On the motherboard, make sure the gray wing-shaped lever is pressed down:

Remove the top two rear ports of the back of the case by bending them inward back and forth until they snap off:

Remove the plastic cover and any protective covers from the graphics card, then put it gently in place. Make sure the connector lines up with the black PCI Express x16 port on the motherboard.

As you push down, the graphics card will fit snugly and the little wing-shaped lever will snap back to hold it down. Make sure the screw holes on the back line up. You'll want to add a single coarse screw to hold the GPU in place firmly.

Now plug in the 6-pin power connector from the power supply to the power port on the side of the graphics card:


Step 20
Now to clean up the cables and make the inside of the case somewhat tidy. Use zip ties and twisty ties, and try to route cables out of the way of any fans or components. The goal is to make sure the cables do not block airflow or rest against anything that moves or gets hot.
The power supply will have a lot of unused cables coming out of it. Carefully coil/fold them up and neatly push them into the unused optical drive bay (between the hard drive and optical drive). Use ties to secure them. If we were using a more expensive modular power supply, we wouldn't have extra wires hanging around, but since this is a budget build we make do with what we have.
Your system should now look similar to this:


Step 23
With the side panels back on:

Your PC is done!
What's Next
It's a good idea to run through the guide again really quick to make sure you didn't forget anything. It can be easy to forget to connect a power or data cable. Usually this won't cause any damage, but may error when booting.
To test it, connect your PC up to your keyboard, mouse, monitor, and power, and then press the power button on the front. I recommend removing one side panel and making sure all of the fans are spinning properly. When you first start it, the fans may spin loudly or change speeds multiple times. This is normal.
You can get into the BIOS by tapping Delete repeatedly during startup. The BIOS allows you to check hardware and various settings. Refer to the motherboard manual for BIOS details.
Operating system installation won't be covered in this guide.
Troubleshooting
If the PC doesn't do anything when you press the power button, make sure the power supply switch on the back is flipped to "I" and not "O".
If the PC starts, but does not boot up or shows an error, you may be able to check the error beep codes in the motherboard manual.
If you come across any errors, one good thing to try first is to clear the CMOS. This can fix strange boot issues on occasion and is easy to do. Follow the instructions in the motherboard manual to clear the CMOS.